X6100 LINK
--:--UTC · IT
firmware
+ app

X6100 Link

BETAlatest version
THE FIRMWARE THAT REVOLUTIONISED THE X6100

Same X6100,
a different radio.

The first real renewal of the X6100 in years.

The firmware transforms the radio and works on its own: all digital modes inside the radio, the DX cluster on the waterfall, Field Ops for SOTA/POTA, themes.

The X6100 Link app for Android unlocks its full power: the radio on your phone, digital modes with transmit, the log with QRZ.

by Giovanni Ricciardi IU1WXY · beta software, something may go wrong: report it

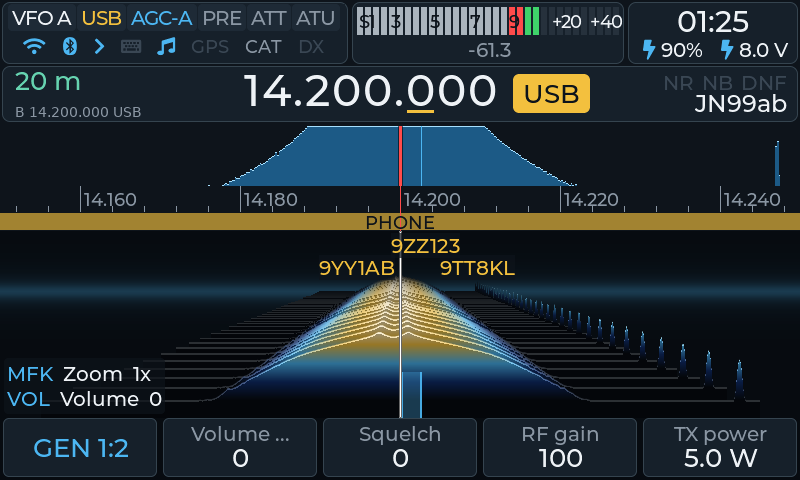
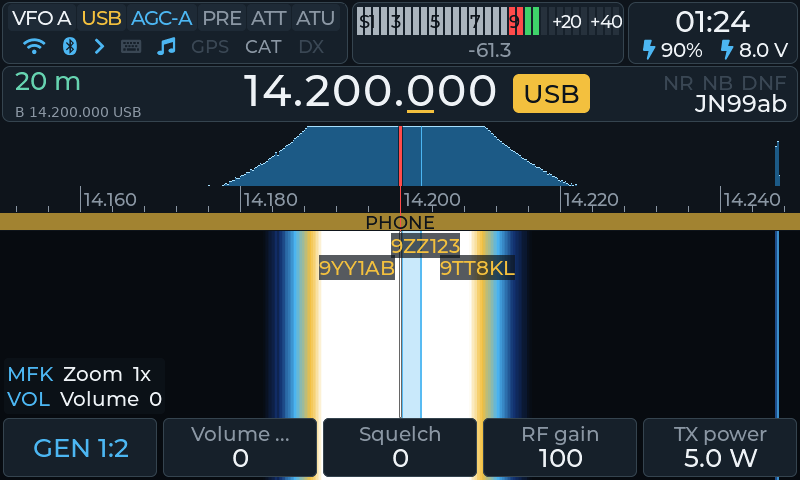
Main screen

Two parts

the firmware is enough on its own

From this version the interface and the library that talks to the radio hardware are written entirely by Giovanni Ricciardi IU1WXY, from scratch: they no longer contain code from other X6100 firmwares. Third-party components included in the image (Linux and the base system, Pat, ardopcf, XARA, codec2, Hany El Imam's SSTV ML denoiser library) remain their authors', under their own licences.

What's new

the date I released each one

Features

pick · open

And more. TUNE up to 10 W with the internal tuner off, for external tuners (7 W with the internal one on); link guard, with an optional link time-out and alerts on the radio's screen if the radio transmits by itself or a transmission does not stop; USB tethering: plug an Android phone or an iPhone into the USB port and the radio uses its connection when Wi-Fi and Ethernet are not there. TUNE · USB tethering

How to use

feature by feature

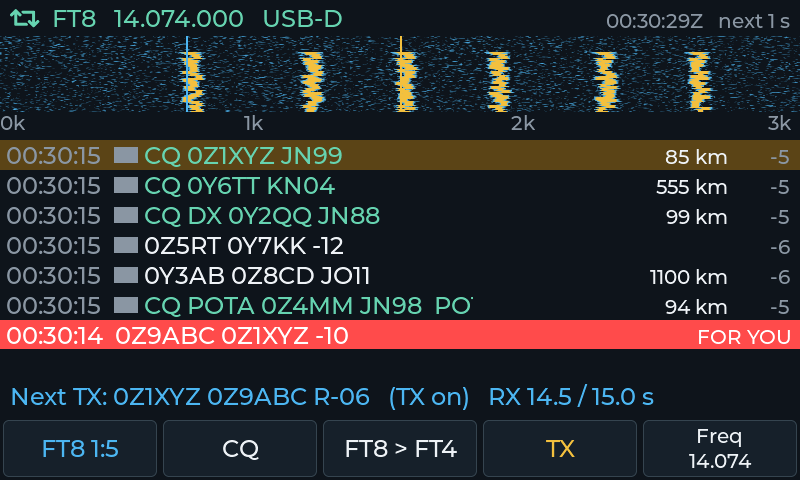
FT8, FT4, FT2, JS8 and WSPR without a PC

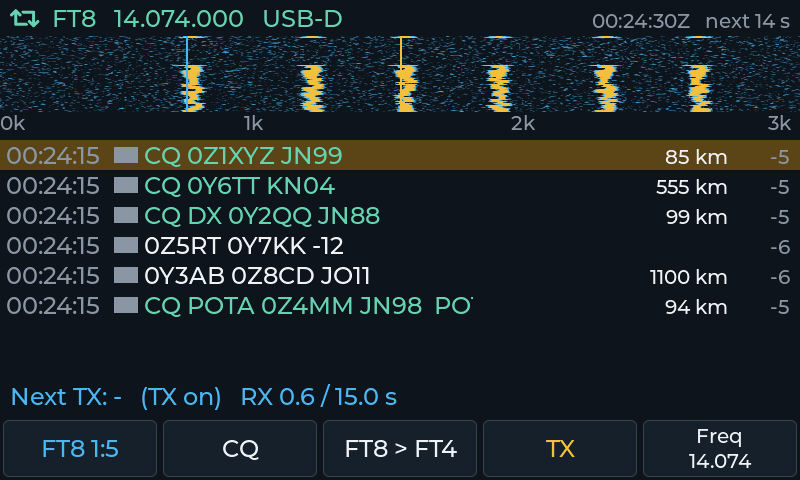
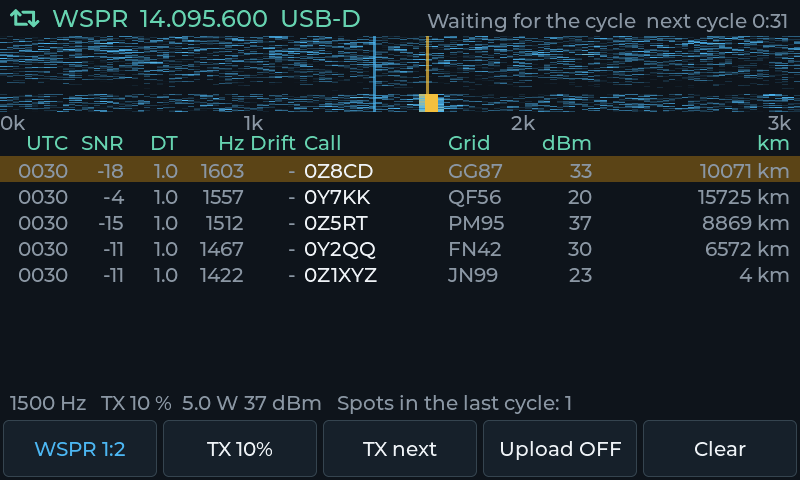
Decodes and transmits right on the radio, with a map of the stations heard. JS8 has activity, stations, messages and inbox; WSPR shows the spots and their map. WSPR can also hop bands by itself.

  1. Set callsign and locator in Settings → Station (hold APP).
  2. Open APP → Digital modes → FT8 / FT4 / FT2, or JS8 or WSPR.
  3. To answer, move the MFK to the line and press; CQ calls, Auto (page 2) runs the QSO.
  4. Keep the time right with Time sync (page 4) or Settings → System → Clock from GPS / NTP.
  5. WSPR band hopping (off by default): the radio takes turns on all the bands in step with the other stations, or uses different bands for dawn, day, dusk and night, worked out from your locator. For each band you choose receive and transmit. It changes band only between intervals, never while transmitting, and if the SWR protection trips on a band it leaves that band out for an hour. Also from the web configurator.

Good to know. In all digital modes the maximum power is 7 W. PSK Reporter and WSPR upload need a network.
In the manual →

FT8, FT4, FT2, JS8 and WSPR without a PC

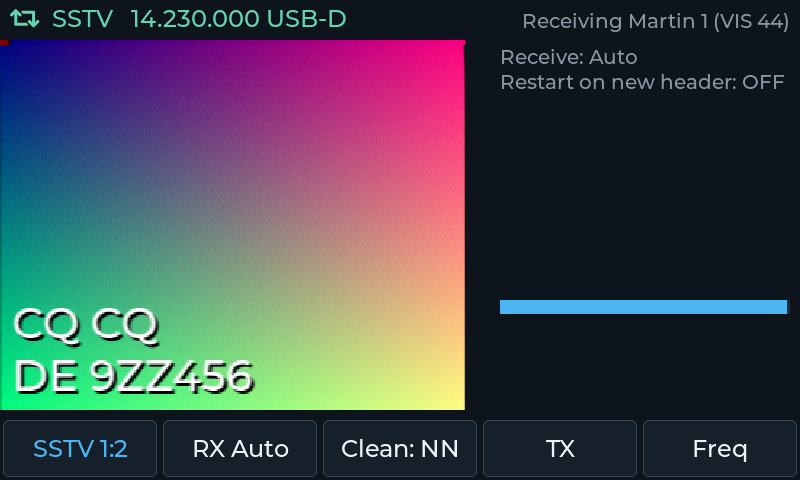
SSTV, WeFax, NAVTEX and DSC from the radio

Receive SSTV images with Denoise and the gallery, and send your own. WeFax weather charts save themselves; NAVTEX and DSC are read on screen. Noise reduction is Off, Classic or ML, and the DSC calls are kept in an archive.

  1. Open APP → Digital modes → SSTV (or WeFax or NAVTEX / DSC).
  2. Freq picks the frequency from the list.
  3. In SSTV, TX opens the menu: CQ, reply or report, image and text, then send.
  4. In WeFax, View changes the size; Faxes (page 3) browses the saved charts.
  5. Noise reduction in SSTV: Off, Classic or ML; the cleaned picture is saved next to the original.
  6. In SSTV TX the level adjusts itself (auto ALC, never above 7 W), and the TX panel also shows the receive state, which pauses while you transmit.
  7. DSC archive: every received call is kept (list, detail, delete, also from the web). With WeFax, NAVTEX or DSC open, the microphone's V/M and UP/DOWN open and scroll the list of stations or calls.
  8. NAVTEX and DSC sit in a lower panel under the spectrum; a key (page 2) switches to full screen and the choice is remembered. Each message has an icon for its type (NAVTEX) or its category and origin, ship or coast station (DSC).
  9. WeFax, NAVTEX and DSC set up reception when opened (zoom, USB-D, NR/NB/notch off) and restore it on exit; the station frequencies are marked on the spectrum, the chosen one with its name.
  10. WeFax anti-fading filter: a filter on the lines makes the charts sharper (adjustable, also from the web) and saves a cleaned copy next to each chart.
  11. DSC shows the country of each MMSI from the full ITU MID table, and the name and country of the USCG HF DSC coast stations.

Good to know. In SSTV TX the maximum power is 7 W. NAVTEX and DSC are receive only.

In the manual →

SSTV, WeFax, NAVTEX and DSC from the radio

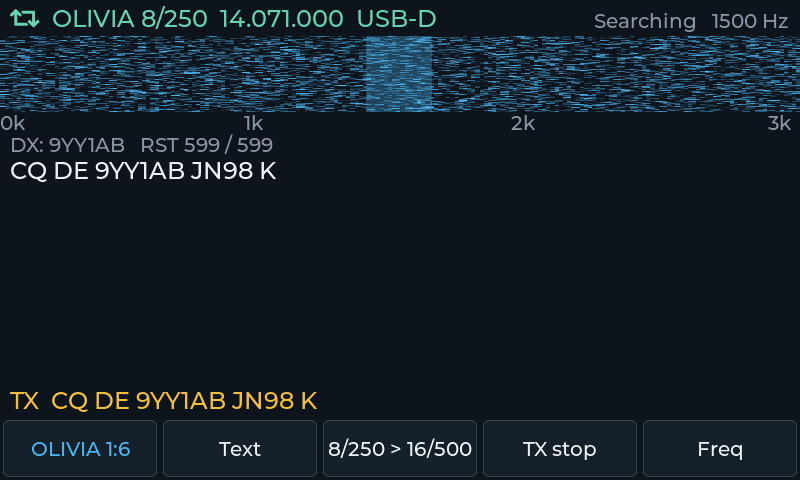
PSK, Olivia, RTTY, JTTY and FSQ: keyboard chat

Keyboard-to-keyboard modes, with macros and ready-made reports. Type on the on-screen keyboard, a USB or Bluetooth keyboard, or from your phone.

  1. Open APP → Digital modes and choose PSK31 / 63, Olivia, RTTY, JTTY or FSQ.
  2. Freq picks the frequency, Mode the variant.
  3. Text types and transmits; macros are on the key pages: press to send, hold to edit.

Good to know. RTTY from the radio is receive only: transmit from the X6100 Link app. Maximum 7 W in TX.

In the manual →

PSK, Olivia, RTTY, JTTY and FSQ: keyboard chat

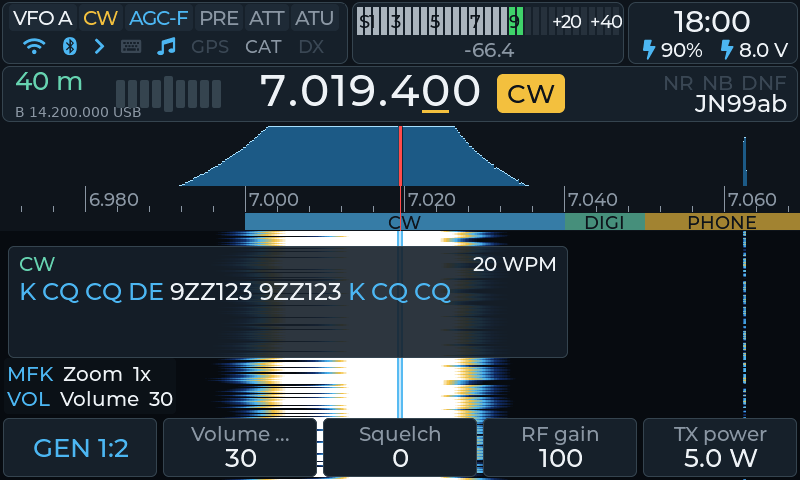
CW: decoder, keyboard, paddle and trainer

The decoder works on the main screen with zero-beat bars. Key from the keyboard, a USB or Bluetooth paddle, even a USB mouse; send messages and beacons and practise with the trainer. The decoder follows QSB and makes far fewer errors.

  1. Press CW: the decoder starts on the main screen (Settings → CW & Keys → CW decoder).
  2. APP → CW keyboard to type and transmit from the keyboard.
  3. MSG opens the CW messages and the beacon; KEY the keyer pages.
  4. APP → Trainer to learn; the USB key is set up in Settings → CW & Keys → Learn USB paddle.

Good to know. With Practice (no TX) in Settings → CW & Keys you can practise without transmitting.

In the manual →

CW: decoder, keyboard, paddle and trainer

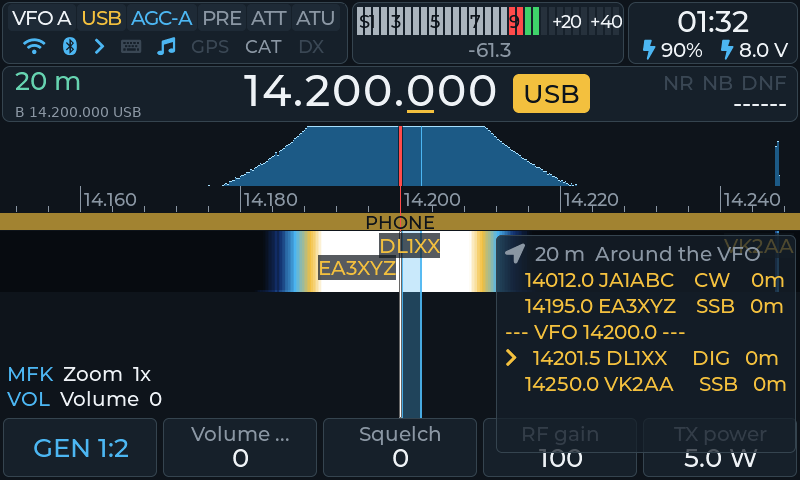
The DX Cluster over the waterfall

Spots appear on the waterfall and in a column around the VFO, filtered by mode, band and programme (POTA, SOTA, WWBOTA, HOTA, WWFF), with alarms for the callsigns you look for. You can also post a spot from the radio. Each spot has the flag of its country.

  1. Connect Wi-Fi in Settings → Network and set your callsign in Settings → Station.
  2. In Settings → Spots choose servers, modes, bands, programmes and alarms.
  3. Column: press DFN until the SPOT page, then List; Tune tunes to the spot.
  4. Post spot sends a spot from the radio.

Good to know. Network and callsign are needed. Settings → System → DX cluster and spots turns everything off at once.

In the manual →

The DX Cluster over the waterfall

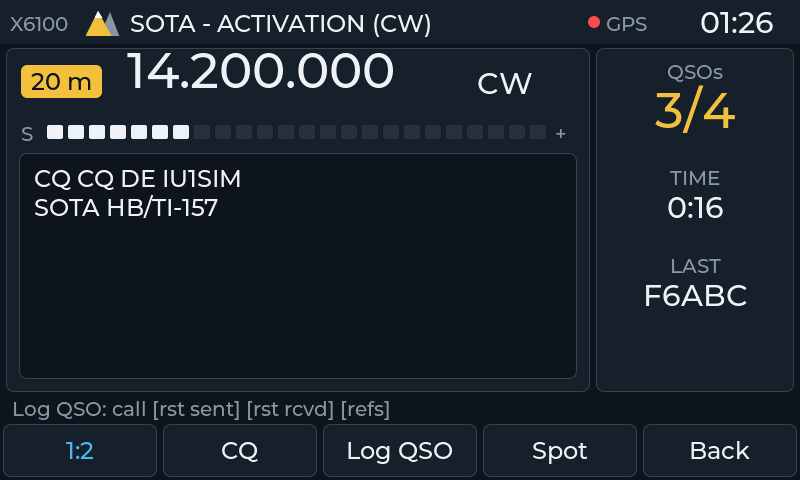
Field Ops: activations without paper

SOTA, POTA, WWFF, WWBOTA and HOTA on one screen with large tiles: the nearest reference, the activation log, the recorded CQ and the spot.

  1. Open APP → Field ops.
  2. At home, download the lists with Download (page 2 of the reference choice): afterwards it works without a network.
  3. Pick the reference with the MFK (or type it with Ref...), then Start.
  4. During the activation: CQ, Log QSO, Spot; End (page 2, press twice) closes it.

Good to know. Spots and lists need a network. Programmes are turned on and off in Settings → Spots.

In the manual →

Field Ops: activations without paper

Broadcast and SWL: what is on the air now

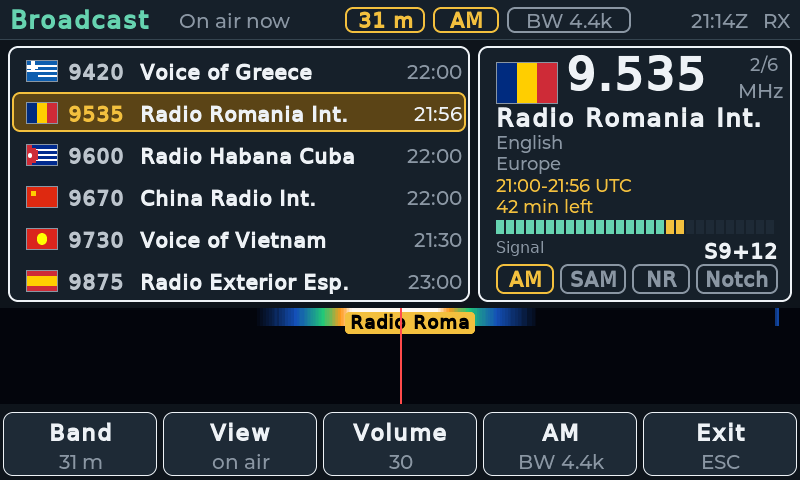
The stations on the air now, on one band or on all, by category: AM broadcast, utility and military, numbers stations, unknown and your own. Each one shows language, area, hours and notes.

  1. Open APP → Broadcast.
  2. Choose a band, or all of them: the MFK picks a station and a press tunes the radio, in the right mode.
  3. SWL memories, separate from the ham ones (up to 200), keep the stations you like.
  4. The box beside the waterfall (off by default) shows the stations near the frequency; the stations on the air in the visible span are marked on the spectrum with their name (Settings → Display).

Good to know. Your own stations go in broadcast-user.csv, uploaded from the browser: the schedule update never overwrites it.

In the manual →

Broadcast and SWL

Bands: which band is open from your QTH

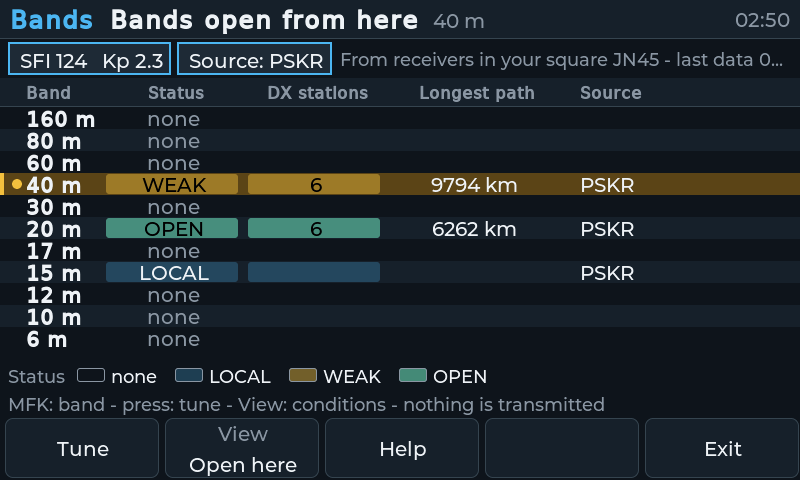
For each band it tells you whether it is open, weak or local only from your QTH, based on what the receivers in your locator square really hear (PSK Reporter, last 30 minutes), with the number of DX stations and the longest link. It also shows SFI and K index. The source of each band (PSKR or RBN) is shown.

  1. Open APP → Bands.
  2. Press View until Open from here.
  3. Turn the MFK to pick a band, then Use band.

Good to know. It never transmits. It updates at most every 20 minutes and only while the view is open: it needs a network. The Continents and Minutes views show band conditions.

In the manual →

Bands, Open from here view

PTT from a Bluetooth headset

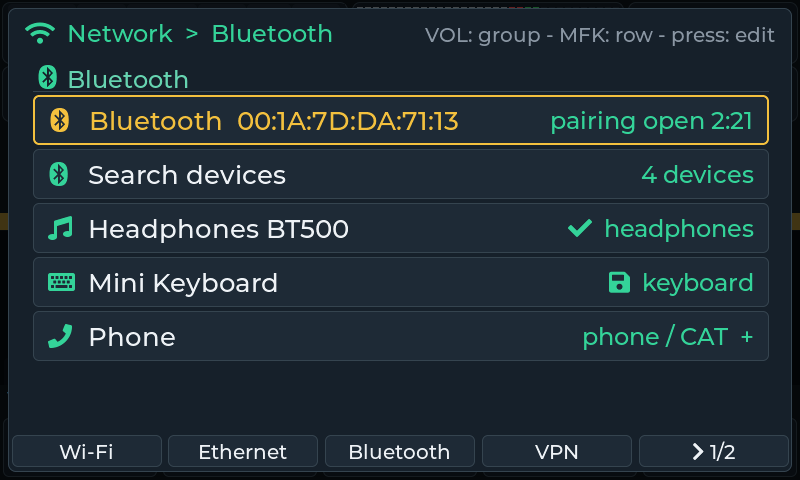
The PLAY/PAUSE key of a paired headset starts the transmission, and the next press releases it.

  1. Pair the headset in Settings → Network, Bluetooth group.
  2. Turn the option on in the settings (off by default).
  3. Press PLAY/PAUSE on the headset to transmit, and again to release.

Good to know. Only a paired, trusted and connected headset counts. It transmits with the same limits as CAT (7 W in the digital modes, time-out, Allowed transmitters) and releases if the headset disconnects. The headset microphone (HFP) is not supported.

In the manual →

PTT from a Bluetooth headset

The radio, your way

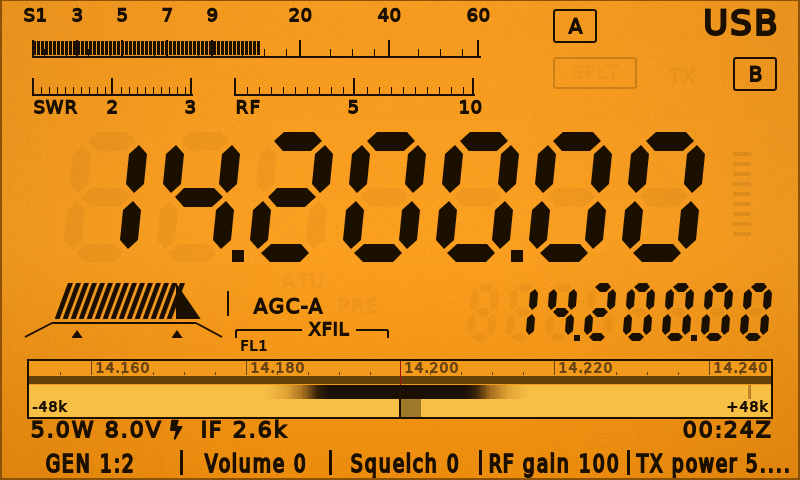
Eight themes: Default, ELEKtrik, DarkLED, Outdoor, Outdoor inverted, Large, Classic and Skeuo. Plus spectrum, waterfall and S-meter colours, the font, the key light. Outdoor and Outdoor inverted are for sunlight, one light and one inverted, with maximum contrast.

  1. Settings → Display → Theme.
  2. Font in Settings → Display → Font.
  3. Colours in the next rows; Reset to the theme colours goes back to the theme's own.

Good to know. Outdoor is black and white, made for reading in full sun.

In the manual →

The radio, your way

The 3D waterfall

The waterfall becomes a scrolling landscape: strong signals are mountains, noise is flat ground.

  1. Open Settings → Display.
  2. Turn on 3D waterfall.
  3. With 3D smoothing choose how much to smooth the picture.

Good to know. Turn it off from the same row: the waterfall goes back to normal.

In the manual →

The 3D waterfall

The radio in your browser, and wfview on the network

The radio has its own site: open http://x6100.local from your PC or phone. wfview sees it on the network as an IC-705. The radio can also send WSJT-X-format UDP messages (FT8 and WSPR decodes, logged QSOs) to a program on a PC, such as GridTracker or JTAlert. After you log in you also see the radio's screen, live.

  1. Connect the radio to Wi-Fi in Settings → Network.
  2. Open http://x6100.local in the browser.
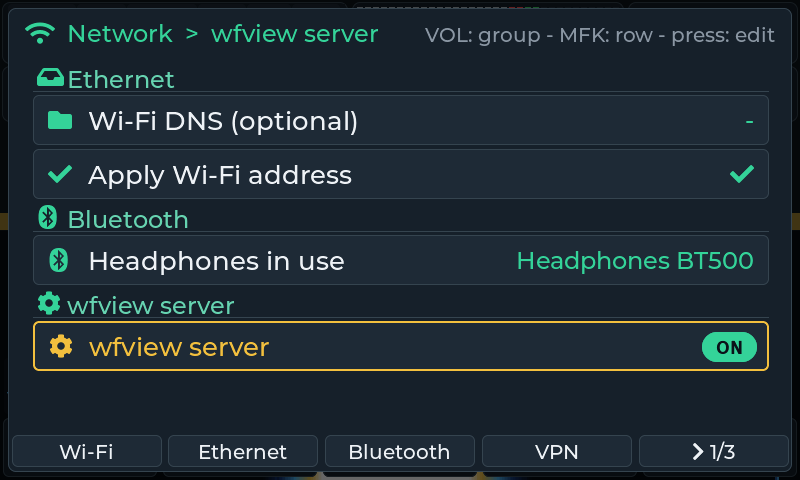
  3. wfview: Settings → Network → wfview server, turn it on and choose user and password.
  4. In wfview use the address x6100.local and port 50001.
  5. The radio's screen in the browser: after the login of the web configurator you see the radio's screen live, view only. A discreet icon on the radio tells when someone is watching. It is turned off in Settings → Network.

Tip: for the X6100 Link app and the radio's web page the steadiest link is a cable. A USB-C Ethernet adapter plugs into the radio at any time, with Wi-Fi on too.

Good to know. wfview accepts one client at a time, and without a password it refuses every login.

In the manual → · WSJT-X over the network →

The radio in your browser, and wfview on the network

Your radio from anywhere, with Tailscale

Tailscale is a free private network (VPN) to use the radio away from home, as if you were at home: the web configurator, the X6100 Link app, TCI and WSJT-X all work. It is off by default: turn it on from Settings → Network → Tailscale and link it to your own Tailscale account. No ports are opened on the router and nothing is exposed on the internet.

  1. Open Settings → Network and the VPN group, then the Tailscale window.
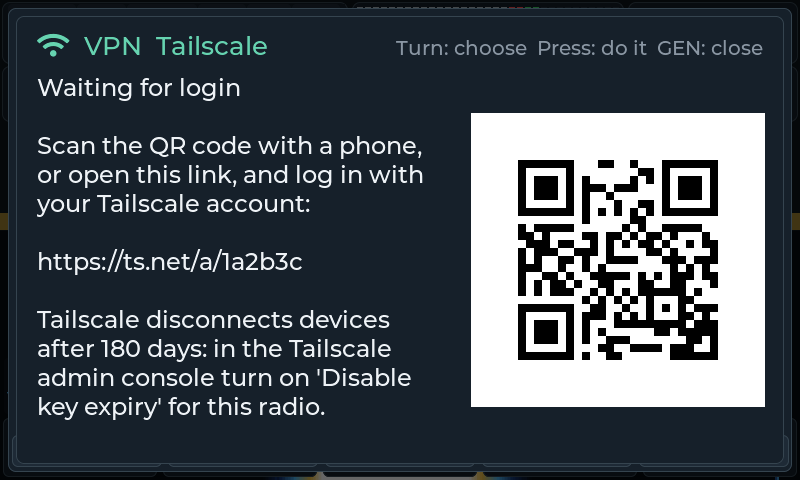
  2. Press Log in: the radio shows a QR code and a link. Scan the code with your phone, or open the link, and sign in with your own Tailscale account.
  3. When the status says Connected, the radio shows its name and its Tailscale addresses (100.x): use them in the app, the browser or wfview.
  4. With Start at boot on, it starts by itself at every power-on. Log out (press it twice to confirm) is in the same window.

Good to know. It is off by default and needs internet; the first time the radio downloads the official Tailscale program. The key expires after 180 days unless you turn on Disable key expiry for the radio in Tailscale's admin console. Anyone on your Tailscale network gets in as if at home. Transmission from the network always asks for confirmation on the radio.

In the manual →

Tailscale: waiting for login, with QR and link

TCI: SDR and digital-mode programs

The radio has a TCI server for the programs that speak the TCI protocol: SDR and digital-mode software on your PC.

  1. Open Settings → Network and turn on TCI server (or use the TCI card of the web configurator at http://x6100.local).
  2. Leave TCI port at 40001, and choose TCI access: This radio only or Local network.
  3. In the program, connect to the radio's address and port 40001.
  4. The first time the program wants to transmit, the radio asks for confirmation (Allowed transmitters): confirm with the keys.

Good to know. It is off by default. Transmission through TCI follows the radio's rules: PTT lease of 3 s, 180 s at most, 7 W in the digital modes, always with the confirmation on the radio.

In the manual →

The radio on your phone

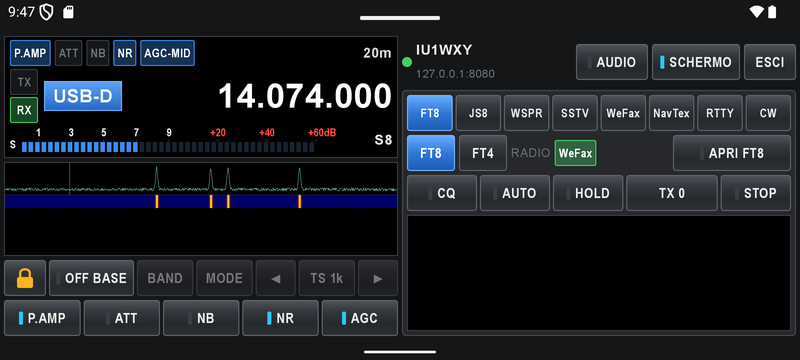
The Android X6100 Link app shows and controls the radio over Wi-Fi: VFO, spectrum, waterfall, audio, digital modes with transmit, the log with QRZ.

The app works only with radios running the X6100-IU1WXY firmware: it does not work with Xiegu's stock firmware or other firmwares.

  1. Turn on the phone's hotspot.
  2. Connect the radio to the hotspot in Settings → Network.
  3. Open the app and tap the radio it finds.

Tip: for the X6100 Link app and the radio's web page the steadiest link is a cable. A USB-C Ethernet adapter plugs into the radio at any time, with Wi-Fi on too.

Good to know. X6100 Link app 0.2 or newer is needed.

In the manual →

The radio on your phone

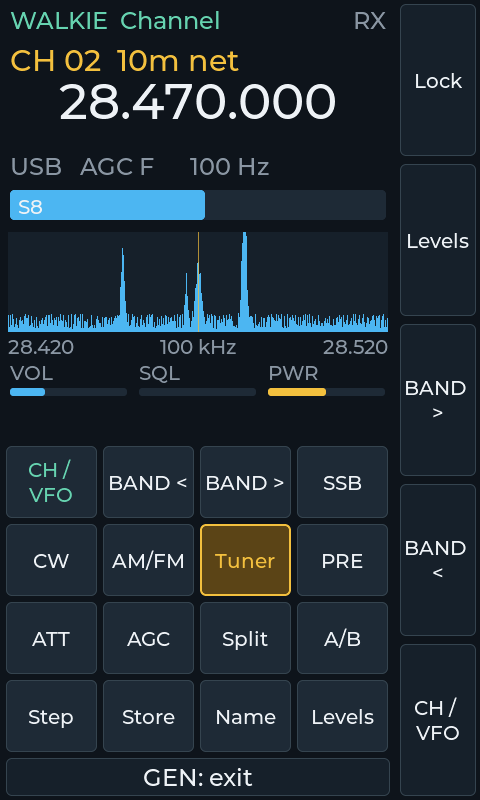
Walkie Talkie: the radio held upright

A simple screen to hold in your hand, with channels, shortcuts and a strip of waterfall.

  1. In the APP menu hold APP, or use Settings → System → Walkie screen.
  2. Choose the microphone in Settings → System → Walkie microphone.
  3. With Knob steps walkie channels the knob jumps from one channel to the next.

Good to know. It is made for voice: for digital modes go back to the normal screen.

In the manual →

Walkie Talkie: the radio held upright

Off Grid Games and Q-code quiz

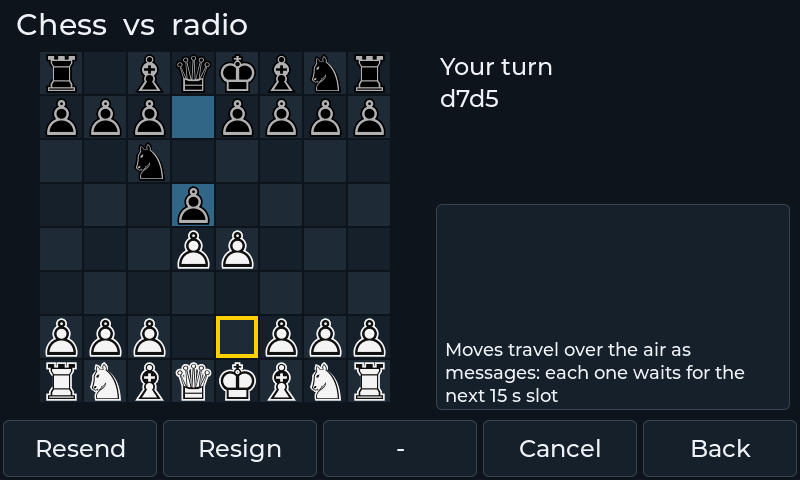
Chess and naval battle against the radio or against another amateur over the air, and a quiz to review the Q codes.

  1. Open APP → Games.
  2. Choose Chess or Naval battle, against the radio or over the air.
  3. Q-code quiz: four answers on the keys, then Next.

Good to know. Games over the air transmit: you need your licence and a suitable frequency.

In the manual →

Off Grid Games and Q-code quiz

On the radio

real screens, 800×480
App menu
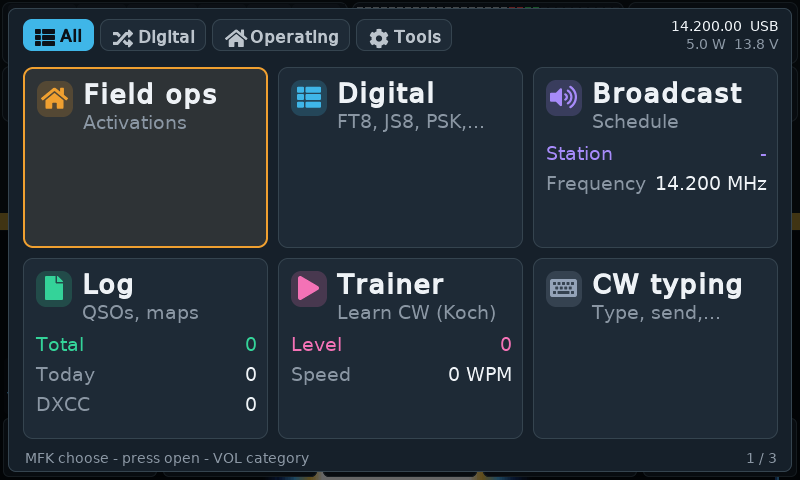
App · everything one key away
FT8
FT8 and FT4 · no PC, no cables
WSPR
WSPR · receive and beacon
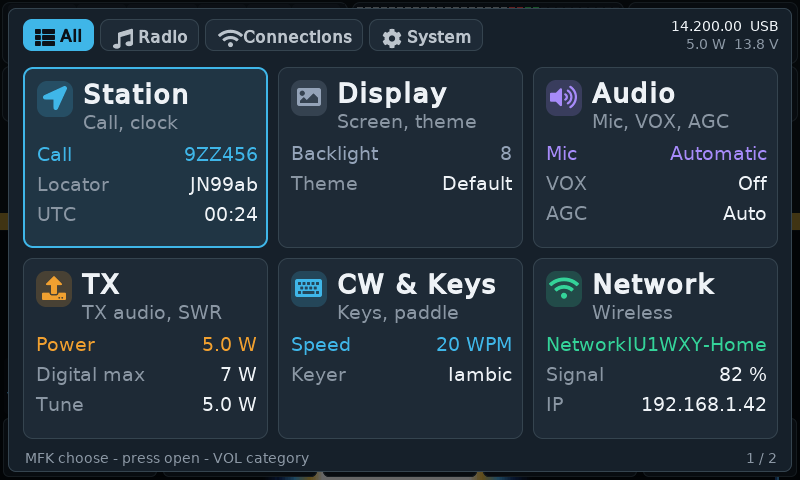
Settings
Settings · large tiles

Install

full guide
  1. Download the image (an .img.xz file, no need to unpack it).
  2. Write it to a microSD with balenaEtcher or Raspberry Pi Imager. 0.2.2 must be installed this way, even if you already have an earlier version; later versions then arrive directly from the radio.
  3. Put the card in the radio and power on.
  4. Set callsign and locator in Settings → Station, Wi-Fi in Network.